


Performance Racing Trim
Chapter 5 – Genoa Trim & Controls
| 5.1 Introduction 5.2 The Genoa Trimmer 5.3 Genoa Power 5.4 Sail Selection 5.6 Reaching Trim 5.7 Conclusion Introduction Genoa trim is a never ending process; the genoa sheet and other controls require constant attention to maintain optimum shape and performance. Every fluctuation in conditions requires a corresponding change in trim. Don’t expect huge leaps in speed. Work for a boat length here, and a few feet there. Great trim is the sum of many small adjustments. It adds up. This chapter will start with a look at the role of the jib trimmer in upwind performance. From there we will consider the sources of genoa power and proper sail selection. Next, we will look at each genoa control. We will start from the initial set of each control, and then move on to refined sail trim, matching genoa shape to sailing conditions.
Fig. 1. Genoa trim is a never ending process of trim and fine tuning to match sail shape to the prevailing conditions and performance goals. In subsequent chapters we will explore mainsail trim and helming. Later, in Chapter 8, we will also explore upwind performance problems and suggest methods for resolving them. The Genoa Trimmer The genoa trimmer guides the boat upwind. Through sail trim, and through communications with the driver, the genoa trimmer guides the boat to the optimum balance of speed and pointing. The genoa trimmer monitors performance moment to moment, using one or all of the following:
Based on current performance the trimmer directs adjustments to improve (or maintain) performance. Changes include adjustments in genoa trim, changes in mainsail trim, and changes in driving style. It is critical for the trimmer to communicate the current state of performance, to suggest the means to improve, and then to report on progress as adjustments take hold. As we explore genoa trim further we will look at the specific adjustments which might be called for in a variety of conditions. Genoa Power There are three sources of sail power: Angle of attack, shape, and twist.
Fig 3.
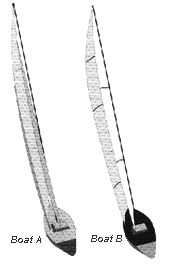
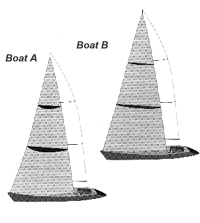
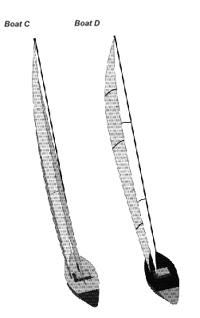
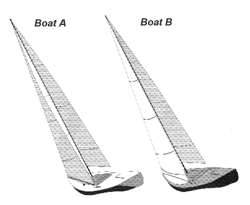
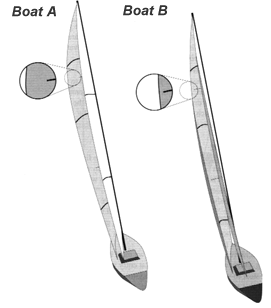
Fig 4. Sail Shape: Boat A has deep genoa shape, for extra power. Boat B has a flat genoa shape, preferred for smooth water and heavy winds. Twist: – Fig 5. Twist: Boat C is trimmed for power, with little twist. Boat D’s genoa is twisted open, spilling power. Initially the sheet’s primary impact is angle of attack, pulling the sail in. As the sail nears full trim the sheet increasingly pulls the sail down (not in). At this point the primary impact of trim is a change in twist.Total Power, Mix of Power
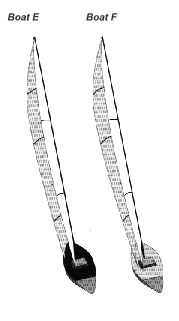
Fig 6. Twist versus Angle of Attack: Boat E has a wide angle of attack. – the entire sail is open, while Boat F has twist – the upper leech is open, but the lower part of the sail is trimmed inboard. Sail Selection The first step in genoa trim is to choose a sail based on conditions. Each sail has a designed strength and performance range. The optimal safe wind range for a given sail is available from the sailmaker, though with modern materials sail strength is less an issue than size and shape. The sail will be wrong from a performance standpoint before you threaten its strength. [This statement is not a warranty. Do not blow out your sails.] At the crossover between two sails several secondary factors influence the decision. Sea State Trend of Conditions Beware. Do not start with a smaller sail because you anticipate the wind building into its range. Use the smaller sail only if the wind is already in its range and you expect it to continue to build. Performance Records Two notes here: 1) Good record keeping can also help you in subsequent sail purchases. If you find you want to carry one sail up into the range where the next sail would supposedly be better then report this finding to your sailmaker. This information will help in the design of future sails. Note 2) Once you know the exact crossover wind speed for each sail in your inventory, it is time to get a new boat. Sometimes you can delay this by changing your sail inventory. Testing Better still, do your testing in practice against a well sailed sistership. You should sail with different sails, and then both switch. When you find which sail is faster do further testing to optimize performance with both boats using the same sail. Fig. 7 Sail selection is based on wind strength, sea state, and the trend in conditions. Careful record keeping can help us know the proper sail selection. Halyard Initial Trim Draft Maintenance Draft Tuning Easing the halyard will allow the draft to move aft, resulting in a flatter, or “finer” entry. This fine entry will result in a closer pointing shape, but with a narrow steering groove. In easy steering smooth water conditions this softer halyard will allow for better pointing. To achieve proper halyard tension we must balance pointing ability with groove width. A flat entry which we cannot steer to will be slow; a round easy-to-steer entry will not allow us to point. Fig. 9 Boat A – Draft aft creates narrow angle of attack. Boat B – Draft forward and wide angle of attack. Measuring and Duplicating Halyard Settings First, put a one inch wide mark on your headfoil six or more feet above the deck – as high as you can reach conveniently. (Your headfoil should be fixed in place. If properly installed it should not move up and down on your headstay.) Next, set each jib (in appropriate conditions) and set the halyard tension properly. Mark the jib luff to match the mark on the headstay. At the sail’s upper end you may need to pull a little above the mark, and at the low end you will want the halyard slightly eased from this setting. Fig. 10 Use marks on the sail and foil to set halyard tension. These marks are particularly valuable when setting the jib prior to a spinnaker takedown. It is very hard to judge appropriate upwind halyard tension with the sail loosely sheeted on a reach. One more trick: Overhoist the sail slightly and ease down to the mark. This helps assure even cloth tension over the length of the luff. Headstay Sag Initial Trim Depth Maintenance Depth Tuning Fig. Fig 11a – A tight headstay creates a flat closewinded, low drag shape best for heavy air and smooth water.
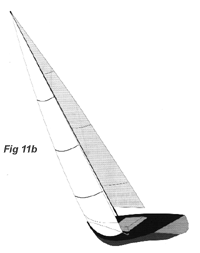
Fig 11b – A sagged or loose headstay produces a deeper, more powerful shape, best suited for light to moderate winds and chop.
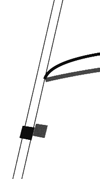
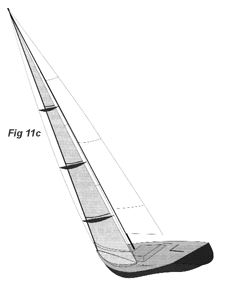
Fig 11c – This figure shows a deep sail shape silhouetted over a flat shape. As the breeze changes the headstay sag will change due to changing sail load. Adjustments will first be needed simply to maintain shape. From there sail shape can be fine tuned to the conditions. A secondary affect of headstay sag is a change in entry shape, similar to halyard control. More sag creates a rounder entry; a tighter headstay creates a flatter entry. Consequently any adjustment in sag should be followed by a check of halyard tension to be sure entry shape is proper. Tightening the headstay flattens the entry; and the halyard may need to be snugged to put some shape into the front of the sail. Sagging the headstay rounds the entry. A matching ease on the halyard can prevent the entry from becoming too round. Genoa Leads Initial Trim NO, the telltales will not all break together. The upper telltales will luff first, and the break will spread down. Fig. 12 – The jib telltales will NOT all break at the same time. The upper part of the sail will break first. and the luff will spread down form there. Balance of Power Moving the lead forward makes the sheet pull down more on the upper part of the sail, trimming in the top. Moving the lead aft will cause the sheet to pull back on the foot, like an outhaul, without trimming the upper part of the sail as much.
In smooth water move the lead aft to open up the sail. This allows the genoa to be trimmed in closer to the main without clogging up the slot. The foot is stretched flat. Overlapping genoas will trim against the shroud base. The telltales break first aloft, and the lower telltales may even be partially stalled while the uppers spin. This flatter shape allows harder trim and thus higher pointing. In over powering conditions move the lead aft to flatten the foot of the sail and spill open the top; reducing power throughout. Fig 13 – moving the genoa leads changes the shape and power of the foot and leech of the genoa. Boat A – Moving the lea aft flattens the foot and opens the leech, reducing power. Move the lead aft to reduce heeling when overpowered and for closer pointing in smooth water. Boat B – Moving the lead forward adds shape and power in the foot and up the leech. Move the lead forward for extra punch in waves. Adjustable Jib Leads Inboard and Outboard Leads In heavy air an outboard lead de-powers the slot. With an overlapping genoa and the main traveler down the slot will be clogged. Move the lead outboard to open the slot for speed and to reduce heeling. The danger here is a loss of pointing ability. Before moving the lead outboard try first to de power by easing the sheet a few inches while leaving the lead in its regular (aft) heavy air position. Only in extreme conditions – when you ought to have a smaller sail – is an outboard lead effective. In very light air an outboard lead prevents the slot from being clogged and eases flow. Hold the lead outboard and reach off to build speed. Once you have speed then try pointing (back to the harbor). Repeat from above: Speed first. From our initial set we can fine tune shape to suit conditions. Each control can be fine tuned; and as we adjust one we will need to check the impact on others. As stated above, genoa trimming is a never ending process. Genoa Sheet Initial trim One or Two Inches The difference between good trim and great trim is effort. Get good speed and test extra trim. Try for extra pointing without sacrificing speed. If speed suffers ease for a moment to build speed, and try again. Fig. 8. The genoa sheet is the primary control. the sheet affects power, shape, and angle of attack. Trim the sheet so the genoa shape balances speed and pointing, and play the sheet with each change in conditions or performance – easing to build speed and trimming to point higher when speed is good. Be prepared to check the sheet trim with every change in secondary controls. Any change in the halyard, headstay, or lead will affect the sheet. In final trim the difference between fast and slow is only a couple of inches. Here, Boat A is eased for acceleration. Boat B is fully trimmed for high pointing.The genoa sheet must be played with each fluctuation in conditions or performance. In a lull, or when the boat is slow, the sheet should be eased. As a puff hits the sheet may need an initial ease, and then trim as the boat accelerates. Secondary Affects Raising the halyard raises the head of the genoa, and increases the distance from the clew to the head of the sail. To keep the same leech shape the sheet would have to be eased as the halyard is raised. The reverse would hold if the halyard were eased. Tightening the headstay is similar to tightening the sheet, except the sail is pulled from the luff rather than the clew. To maintain trim as the headstay is tightened the sheet must be eased. If the sheet is not eased the entire sail will be trimmed in. (And vice versa for more headstay sag.) Adjusting the sheet lead directly affects the sheeting angle. Any lead adjustment will require some sheet adjustment. As the lead is moved forward the sheet may need a slight ease; as the lead is moved aft the sheet generally needs trim. Never Relent Reaching Trim A high clewed Reacher or Jib Top is designed for jib reaching, with extra roundness and power forward. Lacking such a specialty sail, you will have to make do with a standard genoa, trimming it as best you can for the reach. Barber Hauling
Fig. 14 As the genoa sheet is eased on a jib reach the genoa lead is must follow the sail outboard and forward. Boat A – If the lead is not moved the jib foot will be too round, and the leech will spill. At the Cusp As you reach the lower limit of effective reaching trim you have two choices: One is to set your spinnaker – particularly if you carry an asymmetrical spinnaker. If the angle is too close for a chute then the alternative is to head up slightly to keep the jib working effectively. As you gain height you will eventually be able to reach down and set a spinnaker. This is the only time a direct route is not fastest on a reach. Reacher
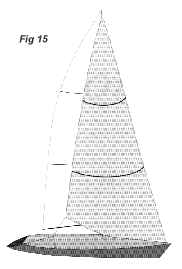
Fig. 15 A reacher is designed for reaching, with a hight clew and powerful shape. Sheet it aft, and choke the sheet to adjustable sheeting angle. Genoa Staysails The genoa staysail can be set between the jib and main, creating a double head rig. Tack it on the centerline at 40 – 50% of J aft, and sheet it evenly between the main and genoa. Try it. If you go faster keep it up; if it makes you slower take it down. (WOW!) If you own one of these relics take care of it – you certainly don’t want to have to replace it. It may also be time to think about a newer boat, where you don’t need to carry so many sails to sail fast.
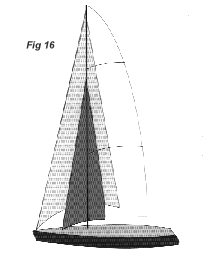
Fig 16 The genoa staysail depicted here may be the last one you see. Give it a close look… Conclusion Genoa trim is a never ending battle to match sail shape to the conditions of the moment. The genoa trimmer leads the boat upwind, guiding the driver up or down, depending on performance. Later, in Chapter 8, we will revisit genoa trim as we consider overall upwind trim solutions in a variety of sailing conditions.
|